
Optional: Column C = Hint · Column D = Category / Tag
Column 1 = Front · Column 2 = Back · Column 3 = Hint (optional) · Column 4 = Category (optional)
How to Use the Excel to Flashcard Generator
Three input methods, instant 3D flip cards, and four export formats — all from a single spreadsheet. No account, no installation, no question limit.
Add Your Cards
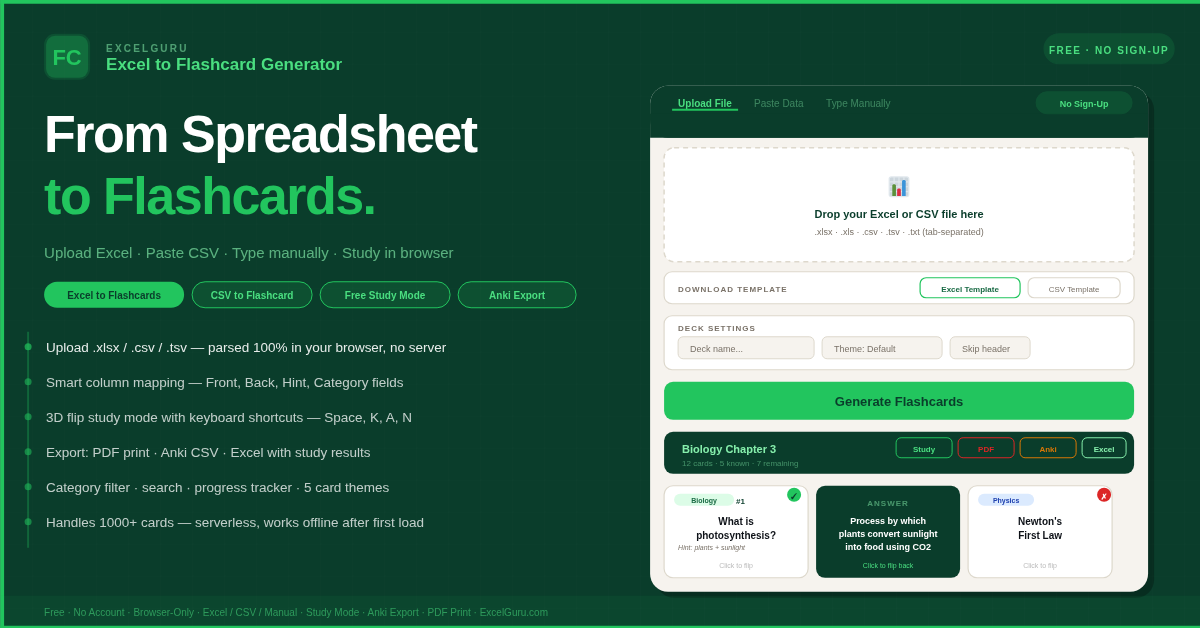
Choose the input method that suits your workflow. Upload File accepts any .xlsx, .xls, .csv, or .tsv file — drag and drop it or browse to select. If your content is already open in Excel or Google Sheets, use Paste Data: copy the rows, click the tab, and paste directly. For a fresh set built from scratch, Type Manually provides a structured form with front, back, hint, and category fields for each card. Download the built-in template first if you are unsure about the correct column layout.
Configure Your Deck Settings
Before generating, give your deck a name and choose a card theme — Default, Ocean, Sunset, Monochrome, or Forest. Toggle Skip header row on if your first spreadsheet row contains column labels rather than a card. Enable Shuffle to randomise the card order so you do not memorise by position rather than by content. If your file has more than two columns, a column-mapping panel appears automatically, letting you assign any column to front, back, hint, or category without renaming anything in your spreadsheet.
Study, Track, and Export
Click Generate Flashcards to build your deck. Filter by category, search across all card fields, and click any card to flip it. Mark each card as Known, Almost, or Unknown using the status circle — the progress bar updates live. Click Study Mode for full-screen 3D flip cards with keyboard shortcuts. When you are ready to share or preserve your work, export as Anki CSV to import into Anki, Print PDF for physical cards, or Excel for a results file showing every card's study status.
In Study Mode: Space flips the card, K marks it as Known, A marks Almost, N marks Not yet, Arrow right skips, and Esc exits. Once you internalise these five keys, you can move through 50 cards in under two minutes without touching the mouse — far faster than any click-based interface.
The Complete Guide to Creating Flashcards from Excel Spreadsheets
Everything students, teachers, HR professionals, and language learners need to know about converting a structured spreadsheet into an interactive, exportable flashcard deck.
What is an Excel to flashcard generator?
An Excel to flashcard generator converts a structured spreadsheet — rows of questions, answers, vocabulary, or definitions — into interactive flip cards you can study in a browser. The problem it solves is re-entry: most people who study from flashcards already have their content organised in Excel. Without a dedicated tool, turning those rows into study cards means typing every item manually into Quizlet, Anki, or Brainscape — one card at a time.
This tool eliminates that entirely. It reads your spreadsheet directly in the browser using SheetJS — a JavaScript library that processes the file locally, without uploading anything to any server. Within seconds, the result is an interactive flashcard deck you can study immediately — no account required, no data leaving your device.
How to format your Excel file
The column layout is straightforward. Column A holds the front of each card — the question, term, or prompt. B holds the back — that is, the answer or definition. C is optional and adds a hint shown on the front face, while D is also optional and adds a category or topic tag used for colour-coded filtering.
If your spreadsheet has a header row — column labels at the top — enable Skip header row in the deck settings before generating. For files with more than two columns, a column-mapping panel appears automatically. You can assign any column to any field, so there is no need to restructure your existing spreadsheet. Download the built-in template to see a pre-filled example with 11 sample cards across Biology, Physics, French Vocabulary, Economics, History, and Literature.
This tool accepts .xlsx (Excel 2007 and later), .xls (older Excel), .csv (comma-separated), .tsv (tab-separated), and .txt files using tab separation. CSV files with comma, semicolon, or tab delimiters are all supported — the separator is detected automatically. Files up to several megabytes parse in under a second.
Three ways to add your flashcards
Drag and drop any .xlsx, .xls, .csv, or .tsv file onto the upload zone. SheetJS reads the entire file in your browser — nothing is sent to a server at any point. This is the fastest path when your study content already lives in a spreadsheet.
Select your columns in Excel or Google Sheets, press Ctrl+C, click the Paste tab, and press Ctrl+V. The separator is detected automatically. This skips the file download step entirely — ideal for anyone working in Google Sheets or who wants to avoid saving an intermediate file.
Build cards one at a time using the structured form. Each row has front, back, hint, and category fields. Useful for creating a small set from scratch, adding cards to supplement an uploaded deck, or quickly building a quiz set without an existing file.
Smart column mapping — assign any column to any field
Most free flashcard tools that accept spreadsheets force a rigid two-column format: Column A becomes the front and Column B becomes the back — no exceptions. In practice, if your spreadsheet has the answer in Column A and the question in Column D, you have to restructure the entire file before uploading.
This tool detects files with more than two columns and surfaces a mapping interface automatically. You choose which column becomes the front, which becomes the back, which becomes the hint, and which becomes the category tag. Furthermore, you can toggle the header row skip with a single switch. Together, these two controls mean you can upload a real working spreadsheet from your existing workflow without changing a single column.
Study Mode — full-screen 3D flip cards
When you click Study Mode, the interface switches to a full-screen session where each card fills the screen. The front displays the question, an optional hint, and the category badge. One click — or the spacebar — triggers a smooth 3D flip animation to reveal the answer on the back. After revealing the answer, rate yourself with one of three buttons or the corresponding keyboard key: Know it (K), Almost (A), or Not yet (N). Pressing Arrow right skips the card without rating it.
At the end of a session, therefore, a results screen shows your score as a percentage, a breakdown of known, almost, and unknown cards, and an option to shuffle and restart. All ratings persist in the card grid — the progress bar at the top of the deck reflects the session results immediately. Notably, the study queue respects your active category filter, so you can focus on a single topic without studying the entire deck.
Choose from Default (white front, dark green back), Ocean (white front, navy back), Sunset (cream front, warm amber back), Monochrome (grey front, black back), or Forest (pale green front, deep green back). The theme applies to both the card grid and Study Mode. Changing the visual environment can help maintain focus across longer study sessions.
Export options — Anki CSV, PDF, and Excel
Anki CSV produces a tab-separated text file with proper Anki metadata headers — separator, deck column, and tag column — so Anki imports it cleanly via File > Import with no manual configuration needed. The category field maps to an Anki tag and the hint becomes a third card field. Print PDF opens a print-ready HTML page formatted as a two-column A4 grid with front and back cards side by side, category badges, card numbers, and the deck name at the top. Use Ctrl+P in your browser and select Save as PDF to get a printable file for physical cards.
Choosing Excel export writes a .xlsx file with two sheets. One sheet contains the full flashcard data — front, back, hint, category, status, and a Known? column. Additionally, a Study Summary sheet shows total cards, known count, almost count, unknown count, score percentage, and the date. In practice, this makes the tool valuable for HR and L&D teams: distribute the deck file, collect completed results exports from participants, and consolidate them into a single reporting sheet without any platform subscription.
Privacy — your data never leaves your browser
This tool is a single HTML file that runs entirely in your browser. Every step — file parsing, deck generation, study sessions, and exports — uses JavaScript running locally. No file is uploaded to any server. Card data is never stored, transmitted, or logged anywhere outside your device. You can disconnect from the internet after the page loads and the tool continues to work identically.
In practice, this matters most for In particular, this matters for HR teams handling confidential training materials, medical students with sensitive clinical notes, and corporate trainers whose question banks should not touch third-party servers. Additionally, there are no rate limits, no maintenance windows, and no scalability concerns. In practice, one person studying alone and ten thousand students using it simultaneously produce identical performance — each session is isolated in its own browser tab.
Who uses this tool and why
Students and exam preparation candidates primarily use the tool to convert lecture notes, vocabulary lists, and definition tables into timed self-tests. For example, a question bank built over a full semester can become a study deck in under 30 seconds. Language learners use it to transform vocabulary spreadsheets — often already maintained in Excel with front and back columns — into flip-card sessions with category filtering by topic or grammar category. Similarly, teachers and tutors use the PDF export to produce professional printed flashcard sheets for class distribution without any design software. Finally, HR professionals and corporate trainers use the Excel results export to track which employees have studied and marked cards as known, feeding that data into existing reporting workflows without an LMS subscription.
Frequently Asked Questions
Answers to the most common questions about converting Excel spreadsheets to interactive flashcards online.