Bloggers and content teams often scatter their planning across a project manager, a notes app, a shared doc, and a physical calendar — and then spend more time reconciling these tools than actually creating content. The result is missed publish dates, duplicated ideas, and team members who cannot find the current status of a post without asking someone.
The Content Calendar Template solves this by consolidating everything into a single Excel workbook. Status tracking, priority levels, team assignment, draft dates, publish dates, a rolling timeline view, a monthly calendar, a holiday list, and an Instagram hashtag organiser all live in one file. There is nothing to sync, nothing to reconcile, and no app subscription required.
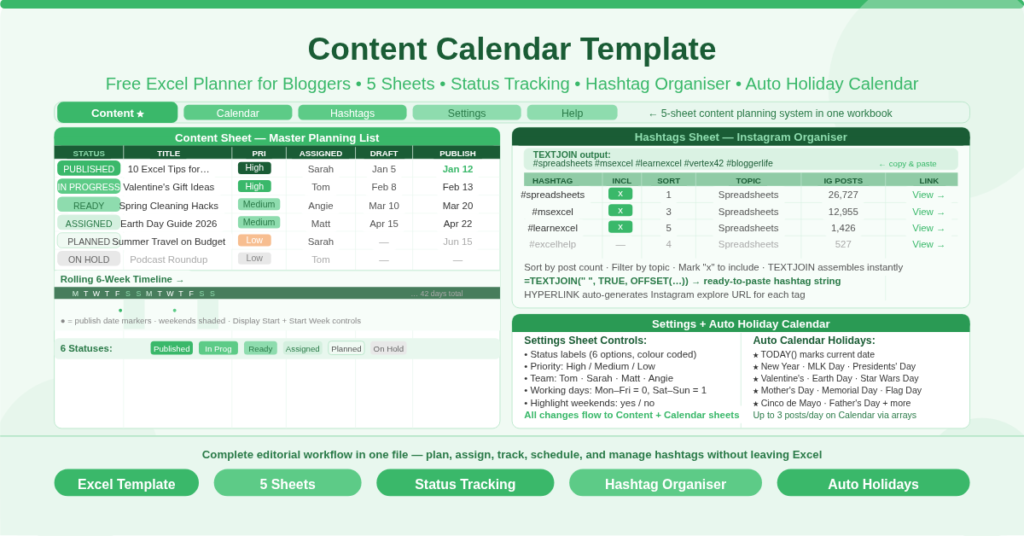
What Does the Workbook Contain?
The workbook has five sheets, each serving a distinct purpose in the content planning workflow.
The Content sheet is the master planning list where every post is tracked from idea to publication. The Calendar sheet is a monthly view that surfaces scheduled content on the correct calendar dates. The Hashtags sheet organises Instagram hashtags and assembles selected sets with a single formula. The Settings sheet controls all configurable options — statuses, priorities, team names, working days, and holidays. The Help sheet provides practical guidance on moving rows, inserting rows correctly, and editing conditional formatting rules.
How Does the Content Planning List Work?
The Content sheet is the operational core of the template. Each row represents one piece of content, and each column captures a specific attribute of that content’s lifecycle.
The Status Column
Six status options track where each post sits in the production pipeline: PLANNED, ON HOLD, ASSIGNED, IN PROGRESS, READY, and PUBLISHED. Conditional formatting applies a distinct colour to each status, making the pipeline state of every post visible at a glance without reading the text. The Help sheet confirms the best way to change these colors is through Page Layout > Themes, using the six Accent colors.
Priority, Description, and Team Assignment
Each post has a PRIORITY field (High, Medium, or Low) that also uses conditional formatting to signal urgency. A SHORT DESCRIPTION column captures the post concept, and a DESC LENGTH column tracks the description’s character count — useful for posts with platform-specific length constraints. The ASSIGNED TO column draws from a team member list defined in the Settings sheet, ensuring consistent spelling and making filtering by team member reliable.
Draft Date, Publish Date, and Link
Two date columns — DRAFT DATE and PUBLISH DATE — track the content timeline for each post. A LINK column holds the live URL once the post is published, giving the list a permanent record of each piece of content and where it lives.
The Rolling 6-Week Timeline
The most visually distinctive feature of the Content sheet is the rolling timeline that extends across columns L through BA — a 6-week window of consecutive dates displayed as day-of-week initials (M, T, W, T, F, S, S). The timeline starts from a Display Start date set at the top of the sheet and advances by one week for each Start Week increment entered.
Each date column shows a single-letter day initial generated by =LEFT(TEXT(date,”ddd”),1). This creates a compact but fully navigable horizontal timeline across which publish dates can be checked against the calendar at a glance. Weekend columns are visually highlighted based on the working-day flags in the Settings sheet, making it immediately clear which dates are active publishing days.
How Does the Monthly Calendar View Work?
The Calendar sheet provides a traditional monthly calendar view of the same content. It displays the month and year at the top using =UPPER(TEXT(B2,”mmmm yyyy”)), controlled by the Year and Month settings in the Settings sheet.
Each day cell on the calendar pulls up to three scheduled post titles from the Content list using array formulas. The display is limited to three items per day — a note on the sheet acknowledges this. Posts are matched to their calendar date via VLOOKUP against the Settings holiday table, which means holiday labels also appear automatically on the correct calendar dates alongside any scheduled content.
The calendar is therefore a dual-purpose view: it shows both scheduled content and marked occasions — from New Year’s Day and Valentine’s Day to Mother’s Day and Cinco de Mayo — in the same monthly grid. This is particularly useful for content teams that plan seasonal or holiday-themed posts and need to see content gaps around key dates.
What Holidays and Special Days Are Pre-Loaded?
The Settings sheet includes a comprehensive list of pre-calculated holiday dates that display on the Calendar sheet automatically. All floating holidays use standard date formulas that recalculate for any year set in the Year input.
Pre-loaded dates include New Year’s Day, Martin Luther King Jr. Day, Presidents’ Day, Groundhog Day, Valentine’s Day, April Fools’ Day, Earth Day, Cinco de Mayo, Star Wars Day, Mother’s Day, Memorial Day, Flag Day, and Father’s Day. Today’s date also appears on the calendar automatically via =TODAY(), making the current date immediately identifiable.
Adding custom holidays or campaign dates to the list is straightforward. The Settings sheet instructs users to insert new rows above a marker row to preserve the table’s structure. Any date added with a label appears on the monthly Calendar automatically.
How Does the Hashtag Organiser Work?
The Hashtags sheet is a fully functional Instagram hashtag management tool embedded directly in the content calendar. It is designed for bloggers who use a rotating set of hashtags across their posts and need to manage, filter, and select them efficiently.
The Hashtag Table
Each hashtag occupies one row in the table with five fields: HASHTAG (the tag itself, prefixed with #), INCLUDE (mark with “x” to select), SORT (a manual sort order number), TOPIC (the category or theme), and IG POSTS (the Instagram post count for that tag). A View link in the IG LINK column is generated automatically using a HYPERLINK formula that substitutes the # symbol and constructs the Instagram explore URL — so clicking View opens the tag’s Instagram page directly.
The TEXTJOIN Formula
At the top of the sheet, a TEXTJOIN formula assembles all included hashtags into a single space-separated string ready to copy and paste into an Instagram post caption. The formula is =TEXTJOIN(” “, TRUE, OFFSET(Table1[[#Headers],[HASHTAG]], 1, 0, D3, 1)), where D3 holds the count of included tags via =COUNTIF(Table1[INCLUDE],”<>”). The result displays as: #spreadsheets #vertex42 #msexcel — or whichever tags have an “x” in the INCLUDE column. Changing which tags are included immediately updates the assembled string.
Why This Matters for Content Teams
Hashtag research is time-consuming. Maintaining a curated, categorized, and sortable list of tags within the content planning file — rather than in a separate note or document — means hashtag selection becomes part of the regular content workflow rather than an afterthought. Sort by SORT number to prioritise your strongest tags. Filter by TOPIC to find tags relevant to a specific post theme. Mark the set you want with “x” and copy the assembled string in one step.
What Can You Customize in Settings?
The Settings sheet is the control panel for the entire workbook. Changes made here flow through to the Content list, the Calendar, and the conditional formatting throughout.
- Status labels can be renamed to match your team’s terminology. The default six labels — PLANNED through PUBLISHED — cover a standard editorial workflow, but they are editable. Adding a seventh status requires adding a conditional formatting rule manually, as the Help sheet notes.
- Priority options default to High, Medium, and Low. These also drive conditional formatting colour coding in the Content list.
- Team member names are listed in the Assigned To section. Add or remove names here to keep the dropdown options in the Content sheet current and consistent.
- Working day flags mark each day of the week as a work day (0) or non-work day (1). Saturday and Sunday default to 1 (non-work). Changing Monday or Friday to 1 adjusts the weekend highlighting in the rolling timeline view accordingly — useful for teams that work non-standard schedules.
Holidays and special days can be added, removed, or relabeled freely. The existing entries use date formulas tied to the Year setting, so they always show the correct date for the current planning year.
Who Should Use This Template?
- Solo bloggers managing their own editorial calendar will use the Content sheet to plan posts weeks or months ahead, track draft and publish dates, and ensure nothing falls through the cracks. The rolling timeline view lets them see the next six weeks of planned content without switching views.
- Small content teams of two to five writers will use the team assignment and status columns to divide work and track progress across multiple posts simultaneously. The pipeline view — with six colour-coded statuses — replaces the need for a separate project management tool for content-specific work.
- Social media managers who publish across platforms will find the Hashtag Organiser particularly valuable. Managing a master list of 20 to 30 hashtags, grouped by topic and ranked by post count, makes it far easier to pick the right set for each post without research.
- Seasonal content planners — retail bloggers, food bloggers, travel writers — who build content around holidays and events will benefit from the pre-loaded holiday calendar that flags key dates automatically in the monthly view.
How to Get Started in Three Steps
- Step one: Open the Settings sheet and customize your status labels, priority options, team member names, and working day flags to match your workflow.
- Step two: Open the Content sheet and begin adding your planned posts. Set the Display Start date to the current week and the Start Week to 1 to see the immediate six-week timeline. Enter each post’s title, status, priority, assigned team member, draft date, and publish date.
- Step three: Open the Hashtags sheet and populate your hashtag list with the tags relevant to your content niche. Mark your default set with “x”, check the TEXTJOIN output, and adjust the selection for each post as needed.
Switch to the Calendar sheet to see the monthly view with your content and holidays overlaid. Update the Year and Month settings to navigate between months.
Conclusion
The Content Calendar Template is a complete editorial planning system in a single Excel workbook. It combines a status-tracked content list, a rolling 6-week timeline, a monthly calendar view with auto-populated holidays, and a fully functional Instagram hashtag organiser with a one-click TEXTJOIN assembly formula. Settings for statuses, priorities, team members, working days, and holidays are all configurable from one sheet. Download it today and bring your entire content planning workflow into one place.