Most social media managers juggle three separate tools just to answer one question: “What’s the status of Thursday’s Instagram post?” One spreadsheet holds the captions. Another app tracks approvals. A third calendar shows the publishing date. You waste more time switching between tabs than actually creating content.
The social media schedule template solves this by bringing everything into a single Excel sheet. You get date tracking, post status, topic tagging, full post text, hashtags, character count, and checkboxes for 15+ platforms. No more bouncing between apps. No more lost approvals.
What Is the Social Media Schedule Template?
This template is a dedicated Excel workbook for planning, reviewing, and publishing social media content. It serves content creators, social media managers, small business owners, and marketing agencies.
The sheet includes 20+ columns organized into logical groups:
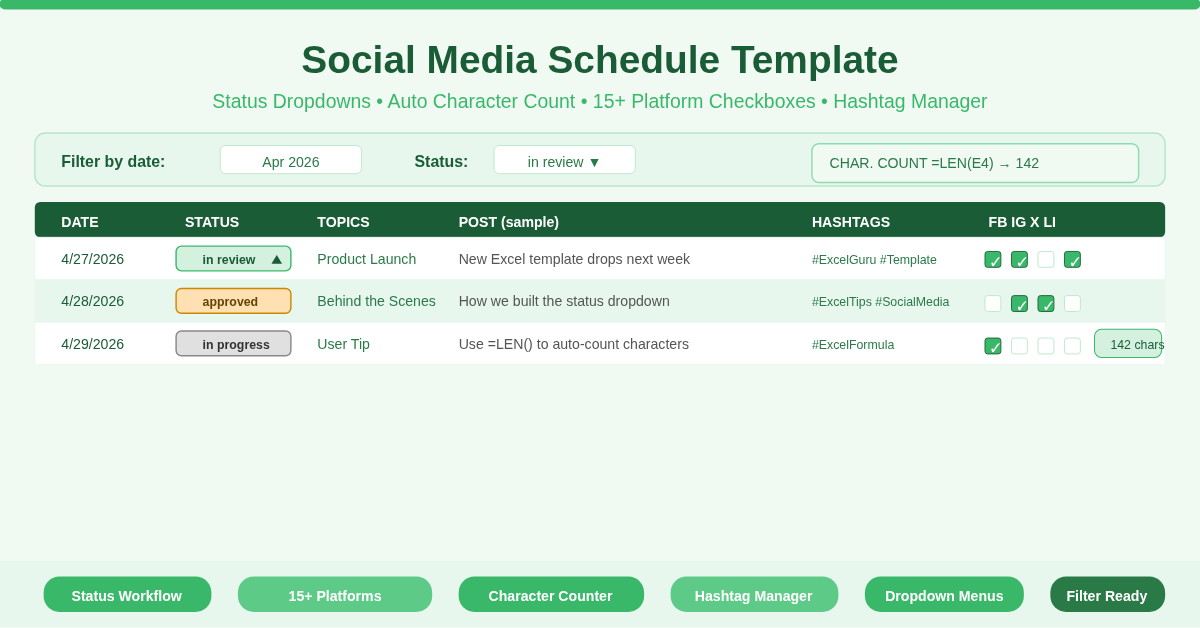
- Date and status – Post date plus a dropdown status key (posted, on hold, nixed, in progress, in review, approved)
- Content details – Topics, full post text, hashtags, and automatic character count
- Platform checkboxes – Facebook, Instagram, Twitter, Blog, LinkedIn, TikTok, Snapchat, Pinterest, Tumblr, YouTube, plus three custom “Other” columns
The template also provides a clear status key at the bottom, so everyone on your team reads the same labels the same way.
Status Tracking Workflow Without Email Chains
The social media schedule template includes a dedicated POST STATUS column with a dropdown menu. You choose from six clear states: posted, on hold, nixed, in progress, in review, and approved.
Why does this matter instead of a simple “done/not done” column? Because social content moves through a real workflow. A writer drafts a post (in progress). An editor reviews it (in review). A client signs off (approved). Then a scheduler publishes it (posted). Sometimes a post gets cancelled (nixed) or paused (on hold).
Each status lives in the same row as the post content. Consequently, you never need a separate approval spreadsheet or a messy email thread. The template shows you everything at a glance. Filter by “in review” to see what needs your attention today. Filter by “approved” to queue up next week’s content.
Platform Checklist for 15+ Channels
Modern social strategies rarely stick to one platform. You might post video on TikTok, infographics on Pinterest, and thought leadership on LinkedIn. Remembering which post goes where is a headache.
This template dedicates a checkbox column to each major platform. The set includes Facebook, Instagram, Twitter, Blog, LinkedIn, TikTok, Snapchat, Pinterest, Tumblr, YouTube, and three extra “Other” columns for emerging networks or regional apps.
Here is how you use them. When you write a post, check every platform where that post should appear. A single piece of content might target Facebook and Instagram simultaneously while skipping Twitter. The checkboxes make this crystal clear. Moreover, they integrate with Excel’s filtering. You can filter to show only posts destined for LinkedIn, then review your professional content in isolation.
Automatic Character Counter and Hashtag Management
Platforms enforce strict character limits. Twitter allows 280. LinkedIn posts perform best under 1,500. Instagram captions accept 2,200 but cut off after 125 in the feed preview. Manually counting characters invites errors.
The social media schedule template includes a CHAR.COUNT column with a simple formula: =LEN(E2) (assuming column E holds your POST text). This formula calculates the exact length of your caption or tweet automatically. No manual counting. No guesswork.
Similarly, the HASHTAGS column gives you a dedicated space to store and refine your tag strategy. You can track branded hashtags, campaign-specific tags, or seasonal keywords in one place. When you copy the post to your scheduling tool, the hashtags are ready to go right next to the caption.
How Does the Status Dropdown Actually Work?
The template uses Excel’s Data Validation feature to create the POST STATUS dropdown. Here is the mechanism.
First, the template stores the six status options in a separate key table (rows 12–17 in the sample). That table acts as the source list. Second, each cell in the POST STATUS column (starting from row 4 downward) applies Data Validation → List → Source = $B$12:$B$17 (or the equivalent range).
When you click a status cell, Excel displays a dropdown arrow. You select one of the six statuses, and the cell stores that text value. Because the source is a named range, you can easily add new status options later without rebuilding the entire column. Simply insert a new row in the key table and expand the source range.
This same Data Validation technique can be copied to other columns if you want standardized topic lists or platform priority scores. The template gives you a working example you can replicate elsewhere.
Practical Use Cases for Different Professionals
Social Media Manager – Manage 50+ posts per week across four clients. Use the status column to track client approvals. Filter by “approved” every Friday to build next week’s publishing queue.
Small Business Owner – Handle your own Facebook and Instagram posts. Write captions whenever inspiration strikes (even weeks ahead). Mark them “in progress” until you add images, then switch to “approved.” The character counter prevents cut-off captions.
Marketing Agency – Assign one sheet per brand by copying the template tab. Use the “Other” columns for platform-specific notes or unique deliverables like Stories vs. Reels. The “nixed” status keeps a record of rejected ideas without deleting the content.
Freelance Content Creator – Track pitches across multiple publications or brand deals. Use the BLOG column for sponsored posts and LINKEDIN for personal branding content. The HASHTAGS column stores campaign-specific tags per client.
Nonprofit Communications Lead – Coordinate volunteers who write posts days before a fundraising event. Statuses help you see who has submitted (“in review”) and what still needs writing (“in progress”). The date column sorts everything chronologically so you never miss a Giving Tuesday deadline.
How to Set Up and Start Using the Template
Follow these steps to launch your social media schedule today:
- Download the Excel file from the link below
- Open the file and review the column headers: DATE, POST STATUS, TOPICS, POST, HASHTAGS, CHAR. COUNT, and each platform column
- Enter your first post date in column A (use any date format your region prefers)
- Write your caption or tweet text in column E (POST)
- Watch the CHAR. COUNT column update automatically with the character length
- Click the POST STATUS cell and choose “in progress” from the dropdown
- Check the platform boxes where this post will publish (e.g., Facebook and Instagram)
- Add hashtags in column F
- Change status to “in review” when ready for feedback
- Finally, switch to “posted” after the content goes live
The status key at the bottom of the sheet reminds you what each color-coded label means. Keep the template open during your weekly content meeting. Use Excel’s filter buttons (Ctrl+Shift+L) to sort by status, date, or platform.
Download Your Free Social Media Schedule Template
Ready to replace three scattered tools with one organized spreadsheet? Download the free social media schedule template below. It works with Excel 2016, 2019, 365, and Google Sheets (with minor adjustments). The status dropdowns, character counter, and multi-platform checkboxes are ready to use immediately.